Friday, December 14, 2012
I'm Back!
Hello everyone!! I am back to crafting, and blogging! On October 1, my husband and I welcomed our second son into the world! We have been enjoying being a family of 4 and enjoying both of our boys!
Today theme is snowflakes with My Cricut Craft Room, so I made some snowflakes cut from adhesive vinyl for my older sons pre-school. His teacher asked me to cut out some snowflakes to place on the walls to help make it feel like winter in the class room. I immediately pulled out my Artiste cartridge and started having fun! I cut 2 different snowflakes at 5, 3.5 and 1 inches so that his teacher had lots of them to hang all over the walls!
Labels:
Artiste,
Cricut Craft Room Design Team,
snowflakes,
vinyl
Saturday, September 29, 2012
Maternity break
Hello everyone!
I just wanted to let you all know that I am taking a little break from crafting and blogging due to the impending arrival of my second son! He is due in the next 2 weeks, and I am spending as much time with my husband and other son as I can before our new bundle of joy arrives! Don't worry, I will be back, it just might be a bit!
I just wanted to let you all know that I am taking a little break from crafting and blogging due to the impending arrival of my second son! He is due in the next 2 weeks, and I am spending as much time with my husband and other son as I can before our new bundle of joy arrives! Don't worry, I will be back, it just might be a bit!
Thursday, September 20, 2012
Theme Day Thursday- Shoes!

Today's theme is to make something with shoes! We are also using pink in honor of Breast Cancer awareness month that is coming up in October! Here is what I came up with. :)
Items used and how to:
- I started with an A2 card base, and some patterned paper. I trimmed the paper to fit the front of my base and wrapped some twine around it. Before securing it to the base, I inked the edges with some Tim Holts distressing ink.
- Next I cut out my cute little flip-flops at 2 inches from Cheerful Seasons! I had to cut the strap layer multiple times as the strap for the right flip-flop didn't want to cut without coming out in 3 pieces. After trying and trying to get it to cut in one piece, I finally just gave up and pieced it together. I wish it would have cut correctly, but I think it just might be a little to small for it to have a nice crisp cut.
- I attached my flip-flops to my card base using some pop-dots.
- The inside is stamped with a sentiment from Pink by Design's Breast Wishes stamp set.
Wednesday, September 5, 2012
My exciting new adventure!
I am so excited to announce that I will now be a Craft Contributor on Our Knights Life blog (formally known as Family and Life in Las Vegas)! My first post goes live next week! Make sure to stop by and check out my craft tutorials, and product reviews!
Tuesday, September 4, 2012
Card creating Tuesday - card with a window
Welcome to Card Creating Tuesday! Today we were challenged to make a card that has a window in it. I knew right away the perfect cartridge to pull out and that is Art Philosophy as it has so many card bases that have windows in them! After flipping through the entire cartridge book, I finally settled on this card!
- Card is cut out at 5 inches (I was able to cut 2 at this size from a 8.5 x 11 inch piece of paper)
- I took the negative stockings that were cut out to make the windows, and put them through my sticker maker and then covered the adhesive with glitter. I then put them back through my sticker maker to make the back of the stockings adhesive and placed them on the inside of the card so that they show show through the window.
- To add some more color to the front, I added a ribbon around the front and then stamped both the front and inside of the card with sentiment stamps from Pink by Design's Christmas Wishes set.
Labels:
Art Philosophy,
Christmas Card,
Cricut Craft Room Design Team,
Glitter,
pink by design,
ribbon
Friday, August 31, 2012
September 100 Cartridge Blog Hop - Day 1
Welcome to Erica's Craft Room
100 Cartridge Blog Hop - Day One!
You should have started at http://mycricutcraftroom.blogspot.com/, if not please hop on over to her blog to star the hop!

For my projects today, I have used the cartridges Christmas Cards, Cheerful Seasons, and Celebrate with Flourish!
My first project is a very cute custom baby shower invitation that I made for a customer. I used Celebrate with Flourish and an the Imagine cartridge Hopscotch to print the cloud paper.
- I printed out the cloud paper on a 12 x 12 piece of white card stock. I then cut that down into 4 x 5 invitations.
- The umbrella us cut from Celebrate with Flourish at 2 inches and attached to the invite using pop-dots
- The invite is stamped with some sentiments from Pink by Design
- Before attaching the umbrella, I ran the invites through my printer to print the invitation information on the back side (not show due to personal information printed)
My second project is a Christmas card from Christmas Cards.
- I cut everything for this card (including the base) at 4 inches.
- I added the crystals from my stash to help add some bling
- The sentiment on the inside is from Pink By Design's Christmas Wishes stamp set
My third project is from Cheerful Seasons.
- A2 card base
- I cut the pumpkin out from Cheerful seasons at 4 inches
- I cut the patterned paper for the front of the card base to 5 3/8 x 3 7/8 and wrapped the ribbon around it before securing it to the card base. The paper is from The Paper Studio's All Seasons II stack.
- The pumpkin is attached to the card base using ATG adhesive.
- The sentiment stamp is from a Fall themed stamp set from Pink by Design, as is the inside sentiment.
- The ribbon is from Hobby Lobby's Harvest crafts ribbon line.
The next stop on the hop is Nadja
Here is the entire line up for today in case you get lost along the way!
1. MCCR http://
3. Kathy http://
4. heather http://
5. Miranda http://www.nanasscrapspot.com/
6. LB http://
7. amy http://
8. Claire http://
9. shelley http://
10. jenn lorist http://
11. Erica's Projects http://
12. Angie http://
13. Cathy http://
14. Tammy - http://
15. Samantha http://
16. Nadja http://
17. Lisa Carrier http://
18. robin http://
19. Jessica S http://
20. Jen L http://
21. Blog Candy http://
Monday, August 27, 2012
Imagine Monday
Today for my Imagine-ation project, I used the Yummy card to make a birthday card for my baby sister!
- I cut out the "Happy" "Birthday" banner pieces from the Yummy cartridge at 1 inch each.
- Before attaching them to my card base, I cut down some patterned paper from my Celebrations stack by The paper studio to 5 3/8 x 4 7/8.
- Before attaching the patterned paper, I strung some green and white twine around it 5 times.
- I attached the patterned paper with ATG, and the banner pieces with some pop-dots.
- The inside is stamped with a sentiment stamp from Pink by Design.
Labels:
birthday card,
Cricut Craft Room Design Team,
Imagine,
My Imagination Monday,
pink by design,
Twine,
Yummy
Friday, August 24, 2012
Scrapbook Friday!
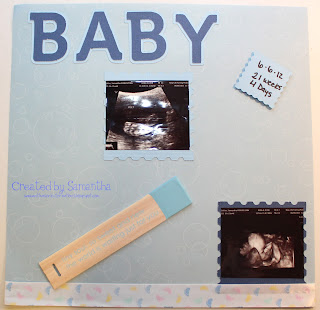
Today's layout challenge was to use a Cricut Lite Cartridge. I love so many of my lite cartridges and knew just the right one to get this layout done!
I used B is for Boy to make this really cute 2 page layout of some of my ultrasound pictures.
I cut out the "Love" die cut and the "Baby Boy" due cut at 4 inches. I then cut out 4 of the postage stamp layer from the LOVE die cut to use as my photo mats. They are also cut at 4 inches. I cut down my ultrasound pictures to fit onto them.
I had accidentally changed my size dial when I went to cut the postage stamps out down to 2 inches. At first I was going to toss the cut, but then realized it made an awesome size to write the info from the ultrasound on!
The paint stick and rectangle embellishments are from a kit by bo-bunny from my stash.
My last addition was the feet ribbon at the bottom of the page.
Labels:
B is for Boy,
Cricut Craft Room Design Team,
layout
Tuesday, August 14, 2012
Card Creating Tuesday
Today's theme for cards is "Thinking of you" I have chosen to make a fun summer related card for this theme!
- I started by cutting out my Popsicle from the Imagine yummy cartridge at 4 inches. I cut this 2 times.
- I used patterned paper from the Doodlecharms paper by Provo Craft, and cut it down to 5 3/8 x 3 7/8.
- Before attaching my patterned paper to my A2 card base, I wrapped some orange twine around it.
- I put ATG adhesive on the back of one of my Popsicle cuts and attached it directly to the patterned paper. For the second one, I put pop-dots on the back of it to pop it up!
- For the inside, I stamped it with a perfect sentiment from Pink by Design's Say it Sweet stamp set that says "I'm missing you like candy"
Labels:
Cricut Craft Room Design Team,
pink by design,
Yummy
Monday, August 6, 2012
Letter F

Welcome to Letter F Monday! To see more projects that use cuts or cartridges that start with the letter, head on over to My Cricut Craft Room to see what the other design team members have made today!
For my project, I used the Imagine cartridge Imagine More to cut out the 2 "Friends" and a "flower"
- I started with a A7 card base, and cut down my patterned paper to just be slightly smaller than the front
- I cut the flower at 2.5 inches and the friends at 4 inches, both are attached to the card base using pop-dots
- The inside of the card is stamped with a sentiment stamp from Pink by Design's new stamp set 29 and holding that reads " We'll be friends til we're old & senile then, we'll be new friends"
Friday, August 3, 2012
August 100 Cartridge Blog Hop
Welcome to Erica's Craft Room
100 Cricut Cartridge Blog Hop Day ONE
You should have started at http://mycricutcraftroom.blogspot.com/ if not please start at the beginning
Welcome to My Cricut Craft Room's August 100 Cartridge Blog Hop
Collectively
the design team uses over 100 different Cricut Cartridges in their
projects during the two days of this hop. Sunday the new members of the
design team will be announced and some have even made a project to share
with you!! What an exciting weekend!!
As special treat enjoy 10% off of your total purchase with Erica's Craft Room Store.
Use the code AUGUST to see 10% off of your total purchase (No exclusions)
Today I have made 3 projects for you using Mickey and Friends, Create a Critter and Birthday Bash!
My first project is a really cute Donald Duck invitation. I used Mickey and Friends to cut out all the cuts for this invitation.
- Donald is cut at 4 inches and all layers were run through my sticker maker.
- I used a black gel pen to trace the detailed line cuts to make them stick out (hands, eyes, mouth outline etc)
- The bomb is cut at 5 inches
- The hats are cut at 1 inch
- The stamp set used is from
- The invite base is 5 x 5 and was cut using a paper cutter. The black strip at the top is 1 x 5 and was also cut using my paper cutter.
My next project is from Birthday Bash and is a very cute bee that is placed on a birthday banner!
- The bee is cut at 3 inches
- He is attached to the banner with pop-dots
- All his layers were attached by running them through my sticker maker
My final project is another cute bee, cut from Create a Critter. This was made for a friend that attached them to a paper lantern, making it look like a bee hive for her daughters 1st birthday!
- This bee us cut at 2.5 inches
- All layers are attached by running them through my sticker maker.
The entire line up for today is:
- MCCR http://mycricutcraftroom.blogspot.com/
- jenn lorist http://www.jennspapercrafts.blogspot.com
- Teresa http://www.createenjoyshare.blogspot.com
- Kathy http://3spoileddogs.blogspot.com
- shelley http://shelley-scrapbookingforfun.blogspot.com
- heather http://heathernovinger.blogspot.com
- Jessica S http://jessicascraftshaque.blogspot.com
- Tammy - http://www.Cuttinandstampin.blogspot.com
- Jen L http://www.mybusycraftylife.blogspot.com
- Erica's Projects http://ericasprojects.blogspot.com/
- Samantha http://www.samanthascricutcreations.blogspot.com
- robin http://create-a-latte.blogspot.com/
- amy http://clayfulimagination.blogspot.com
- Miranda http://www.nanasscrapspot.com
- Angie http://crazyscraplady-angelpie.blogspot.com
- LB http://www.coolbeansbylb.blogspot.com
- Cathy http://cathyplus5.blogspot.com
- Claire http://threewaterscreations.blogspot.com
- Lisa Carrier http://ourcraftingcorner.blogspot.com
- Blog Candy http://ericasblogcandy.blogspot.com/
Labels:
100 Cartridge Blog Hop,
banner,
Birthday Bash,
Create a Critter,
invitations,
Mickey and Friends
Monday, July 30, 2012
Imagine Monday!
Today my project for the design team is a card using the Imagine cartridge Better Together. To check out other projects using the Imagine, make sure to visit Erica's blog at http://mycricutcraftroom.blogspot.com/
- I used a A2 card base
- I cut the patterned paper to 3 7/8 x 5 3/8 so that it would be just slightly smaller than the front of the card base.
- The lady carrying the presents is the cut from Better Together, and she is cut at 4 inches and attached to the card base using pop dots.
- Before attaching the patterned paper to the card base, I wrapped some twine around the paper, and then used ATG adhesive to attach the patterned paper to the card base.
- I used Memento ink and a Happy Birthday sentiment stamp from the Scripted Year set from Pink by Design.
Saturday, July 28, 2012
Pink by Design Anniversary Challange #13!
Today's final challenge was to make a card using this sketch...along with using something that you find in your junk drawer, purse, cup holder etc...just not something from your craft room. I went searching and found some paperclips!


Here is my take on the sketch!
- The card base is 6 1/4 x 5 1/2
- The green layer is 6 x 1.5
- The red layer is 6 1/4 x 2 1/2
- The squares are from a punch
- Stamps are from Beary Merry Christmas
- The paper clips are my "junk drawer" items
Pink by Design Anniversary Challenge #12!
| We have made it to Challenge #12! For this challenge, you had to find
something in your house that inspired you and make a project to reflect
that! I knew right away that I would use my son Jacob as my
inspiration. When I think of him the first thing that comes to my mind
is he is a monkey! So here is my take on Challenge #12! Here is Jacob holding my finalized card! | ||
- A2 Card base
- Monkey cut from Birthday Bash at 3.5 inches and attached to the card base with pop-dots
- Inside sentiment stamp is from Jungle Fever stamp set from Pink by Design.
Pink by Design Anniversary Challenge #11!
Challenge #11 is to make a single layer card. When you think about it, this can be quite the challenge, as most of us are used to layering different papers and embellishments onto our cards. This means that this card needs to be full of different stamps to keep it all one layer. :)
- A7 card base
- I started by using my Puzzled background stamp to stamp around the edges of my card base using Memento Tuxedo Black ink.
- Next I used Memento Tangelo ink and the Orange stamp from Orange you Awesome stamp set. I also used one of the face stamps from this set with the tuxedo black ink.
- Last I stamped the sentiment from the Orange you awesome set in the corner.
Pink by Design Anniversary Challenge #10
Challenge #10 is to make a project using an animal. Having just used the Jungle fever stamp set on my last challenge, I had lots of great ideas for animal projects!
- I cut the elephant from the Cricut cartridge Birthday Bash at 3 inches.
- Patterned paper is cut to 5 3/8 x 3 7/8 to fit the front of the A2 card base.
- The elephant is attached using pop-dots
- The inside is stamped with a sentiment from PBD Jungle Fever stamp set.
Pink by Design Anniversary Challenge #9!
The 9th PBD challenge is to make a project with Buttons! I love adding buttons to projects, as they can add color, texture, and just help jazz up a project. Here is my card using buttons!
- A2 DCWV card base
- buttons from stash
- Goody label die
- Sentiment stamp from Jungle Fever PBD set
- Glue dots to adhere buttons
Pink by Design Anniversary Challenge # 8!
Challenge #8 is to use ribbons or bows. The examples shown were to tie it in a bow, make a flower with it, scrunch it up or do something completely different. I choose to do something completely different....I choose to use only ribbon to decorate the front of my card!
I used a piece of red card stock cut to 5 3/8 x 3 7/8 and 3 pieces of ribbon all cut at about 6 inches. I ran my ribbon through my sticker maker to make them completely adhesive on the backside. I then wrapped them around my card stock and attached that to my card base.
On the inside I used a sentiment stamp from the Christmas Wishes PBD stamp set and used Lady Bug Red from Memento.
Pink by Design Anniversary Challenge # 7!
I found the post for challenge #7!! Challenge #7 is to make a project that has a tag on it. Pretty simple as tags are so easy to add to a project. Here is my card using a tag.
- Patterned paper cut to 3 7/8 x 5 3/8 and attached using ATG
- Tag is a scalloped punch
- Stamps on tag is from PBD Labels stamp set
- Tag is tied to the card base using twine.
- The inside sentiment stamp is from PBD Rain or Shine stamp set.
Pink by Design Anniversary Challenge #6!
The 6th challenge is a sketch challenge! I love sketches as they automatically give me a place to start. What I loved about this sketch, is you can easily use it as a layout or a card. Because I love cards so much that is what I used it for. :)
I used sold black textured card stock for the bottom piece and a Martha Stewart border punch. The pink zebra paper is cut at 7 x 3 and attached with ATG. The squares that the shoes are stamped on are 2 x 2 squares that have had their corners rounded. The ribbon is from The Paper Studio. All the stamps on this card are from the Designer Boots February stamp of the month set by Pink by Design.
Here is the sketch:
And here is my take on it:
I used sold black textured card stock for the bottom piece and a Martha Stewart border punch. The pink zebra paper is cut at 7 x 3 and attached with ATG. The squares that the shoes are stamped on are 2 x 2 squares that have had their corners rounded. The ribbon is from The Paper Studio. All the stamps on this card are from the Designer Boots February stamp of the month set by Pink by Design.
Subscribe to:
Comments (Atom)


